Train tables have for years been great playtime companions for little ones. The cleverly-built pieces offer hours of creative fun to the youngsters, which is probably why they’ve served as a popular Christmas gift for juniors for years.
But as exciting as train tables are, kids tend to gradually lose interest in them as they grow, eventually abandoning them for new avenues of exploration and creativity. That births the question – what next for a train table?
Well, don’t worry.
With some basic DIY skills, a handful of tools, and an hour (or less) to spare, there’s a creative way to breathe new life into that neglected train table in your playroom – and that’s by transforming it into a Lego table.
In this blog post, we will guide you through converting your idle train table into a Lego table that your kids will love playing on. We’ll try to make our guide as comprehensive as possible, so you don’t need to be a woodworking pro to take up the challenge.
Converting a Train Table Into a Lego Table
If you have an abandoned train table that’s taking up much space in your playroom, you don’t have to dispose of it. With a few simple steps, you can convert it into a Lego table, and your kids will thank you for it.
Tools Required
Before you embark on the project, get the right paraphernalia for the job. Here’s what you’ll need:
- A train table
- Piece of MDF or any other board cut to the exact size of your train table
- Peel and stick Lego building plates (number depends on the size of the table)
- Pair of scissors or a box cutter
- High-strength spray adhesive
- A tarp
- Paint
- Primer
- Lego pieces
- Storage bins (number depends on preference)
Procedure
Once you have all these essentials, you can begin the project. Here are six simple steps to follow:
Step 1: Clear the Train Table
The initial step involves removing all the train tracks, bridges, buildings, and other items on the train table. You can place them in a bucket where you can easily access them if you’ll ever need to switch back to a train table.
Step 2: Fit in the Board
Once you have the table cleared, the next thing is to fit the board over the surface. That means you have to cut it to size. Just ensure that the size you cut can fit into the train table and remain secure even without any securing mechanism.
If you don’t have the tools to cut the MDF board, most home improvement stores can do it for you when you talk to them nicely and know the exact size you need. So, double-check if you have the right measurements before heading out to the store so you don’t end up with a piece that won’t fit perfectly.
Pro Tip:
If you want to avoid buying and sizing a new board, you can opt to just remove the train table top and flip it over. However, you’ll need to do this carefully so you don’t damage the wood in the process.
Step 3: Paint the Wood
Once you’ve sized the piece of board correctly, it’s time to give it a facelift. One perfect way to do that is by painting. Begin by laying a tarp on the ground and placing the wood on the cover.
Then, apply a coat of the primer and leave it to dry. Priming will ensure that your paint adheres perfectly to the wood, giving you a better outcome and enhanced durability for your paintwork. But of course, you must ensure the surface is dry, clean, and smooth for the primer to adhere to it easily.
Once the primer is dry, it’s time to do the painting. Spray at least two coats of paint for the best outcome. And as usual, ensure that you allow time for the initial coat of paint to dry before applying the next one.
Pro Tip:
If you want to avoid the cost of painting or the time you have to wait in between the coats, you can opt to use chalkboard contact paper. It is more convenient and will even provide space for you to write on areas you leave uncovered.
Step 4: Lay Out Your Baseplates
Once you’ve painted the wood or covered it with chalkboard contact paper, it’s now time to bring your Lego building plates on board. Lay them out on your table and use Lego pieces to join two building plates.
If you want to keep the storage box on top of the table, remember to factor in the space they need when positioning the baseplates. But if you don’t want them on top, use the entire surface for your Lego sheets.
Once everything is laid out as it should be, mark the areas where cutting is appropriate. A pencil will come in handy at this point. Once marked correctly, remove the baseplates and carefully cut them to the ideal size using a pair of scissors or a box cutter.
Pro Tip:
When laying out the baseplates on the board, don’t lay them flush up against each other, as it will be impossible for the Lego pieces to attach the two. Instead, leave a small gap between the baseplates to make it easy for the Lego pieces to fit perfectly.
Step 5: Relay Your Baseplates
Once you’ve cut the Lego sheets into the ideal size, reconfigure them on the table, joining them with Lego pieces as before. Then, peel the backing from the baseplates and stick them onto your surface.
Do the sticking gently at first to make it easy to realign the sheets in case of misalignment. Once everything is lined up correctly, you can apply more pressure across the entire surface for a more secure connection.
In case the Lego sheets you choose don’t come with their own adhesive, don’t worry. You can use super glue or almost any other type of adhesive to secure the pieces onto the surface.
But then, that would mean adding an extra item to your list of essentials. It will also require you to wait for the glue to set before using the table, but that will depend on your chosen adhesive.
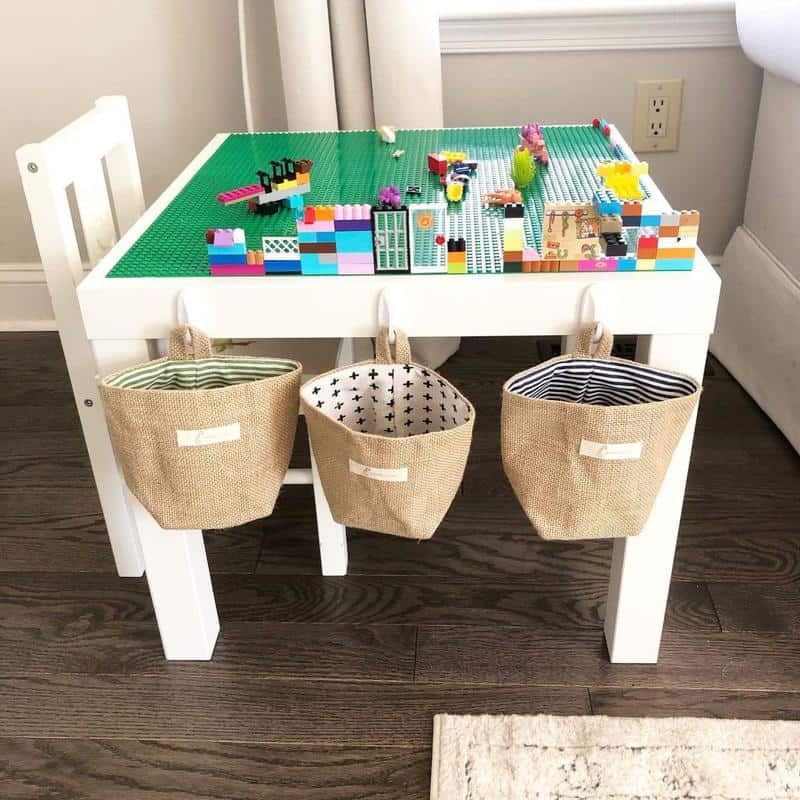
Step 6: Attach Bins
Once you’re done working with your Lego table, it’s time to position the bins. You don’t want Lego pieces scattered all over the playroom, so ensure you have storage boxes in place.
The best place to position your storage boxes is in the most accessible spot. You want to reduce the distance your little one travels to fetch or return the bricks.
You can place them on the table or the side, depending on where you figured out when laying out the Lego sheets. For the side mounting, use velcro strips, glue, clips, clamps, or any other mechanism to help get the work done effectively.
If you have multiple storage boxes, consider sorting the Lego pieces. For instance, you may use separate bins for plates, bricks, mini-figures, and other separate pieces. That way, the youngster will have an easy time locating specific bricks and will even encourage organizational skills.
Once you have all that done, that’s it – you and your little one can now dive into the fun!