Chicken tunnels are a great way to get your chickens where you want them to be while keeping them out of places you don’t want them to be. These tunnels are the free-ranging solution for backyard farmers who still want control over the space in their backyard.
Anyone who has ever tried to do a bit of gardening while keeping chickens will tell you that even the friendliest chickens will show your plants no mercy. If allowed to roam freely, chickens can be a menace to any fruits and vegetables in your garden.
Chicken tunnels, also known as chunnels, provide a solution by allowing your chickens to move about in a restricted space of your choosing. These ingenious setups will also allow your chickens to free range without worrying about predators.
There are plenty of DIY chicken tunnel ideas that you can try out today. As long as you can get your hands on the right materials, building a chicken tunnel should be a quick job.
We look at some of the best chicken tunnel ideas that other farmers have put in place for their flocks.
DIY Chicken Tunnel Ideas You Can Try
1. Chicken Wire Chicken Tunnel
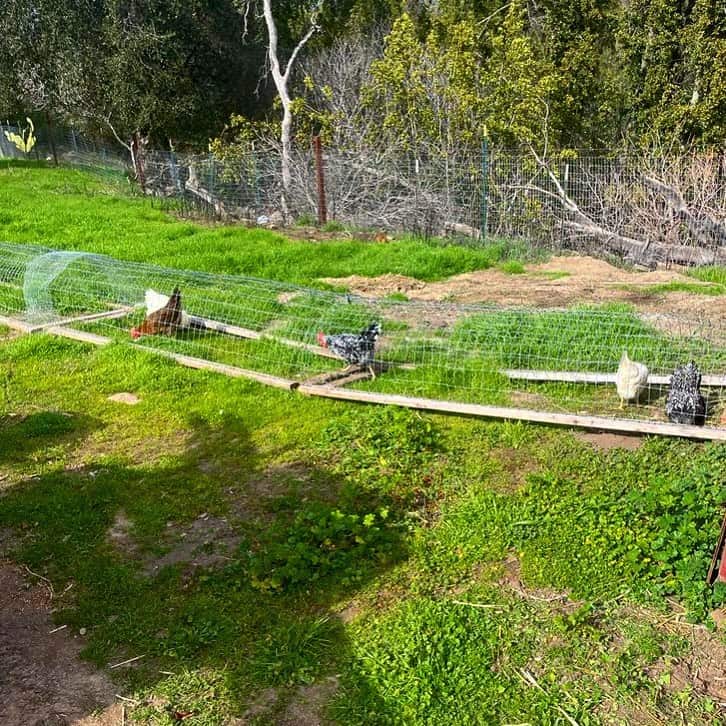
This is one of the simplest chicken tunnels you can build and shouldn’t be more than a one-day project for most people. This chicken tunnel is simply a roll of chicken wire that is supported by a series of ½ inch PEX tubing.
The chicken wire is rolled to form a semi-circular tunnel and the PEX tubing is added to the outside and attached to the chicken wire using zip tires. Landscape staples are used to secure the chicken wire to the ground.
The chicken wire is able to hold its shape in many places without the added support. However, the PEX tubing is necessary for corners and other sections where the chicken wire starts to collapse in on itself.
This is not the most robust or aesthetically pleasing chicken tunnel. However, it shows that even a simple solution can work.
2. The Triangular Chunnel
This channel design is certainly more robust than the first and the result also looks better. To form one part of these tunnels, three wooden triangles are placed between two 12-foot-long pieces of lumber and nailed or screwed in place.
A support piece is added at the top to make the frame more rigid before it is wrapped using chicken wire which is stapled in place. These chunnels are strong and lightweight.
The main drawback of making this DIY chicken tunnel is that depending on the wood you’re working with, you may have to do some measuring and cutting as seen in the video.
3. Simple Chicken Tunnel
This is a slightly better version of the first chicken tunnel, and it may cost you a little extra. The result is a chicken tunnel that is similarly simple to put together but is certainly more rigid and less likely to collapse.
Instead of the PEX tubing, it uses plastic-coated metallic garden hoops which are stronger and more rigid. Another difference between the two is that this chicken tunnel is made in multiple sections instead of one continuous one.
The chicken wire is also secured using zip tires, although twist ties are also an option. The different tunnel sections can be used individually or joined together to form longer sections.
4. Bird Netting Chicken Tunnel
This is an excellent example of how you can repurpose certain things in your backyard to make a chicken tunnel.
Here the farmer uses ½ inch electrical conduits to form the frame that supports the chicken tunnel. However, the approach should work just as well with garden hoops or something similar.
The hooped metal supports are simply placed at strategic locations and bird netting is pulled tight on top of the supports.
This is a simple chicken tunnel that can be used to control where your birds go. However, the bird netting is made of plastic and won’t offer significant protection from predators.
5. Pest-Proof Chicken Tunnel
Wire mesh is a popular material for building DIY chicken tunnels. This material is strong and rigid and is able to hold its shape without the need for additional support structures like the piping used in the previous chicken tunnel designs.
However, depending on the size of the spacing in the wire mesh, certain small pests may be able to enter the chicken tunnel.
These predators may not be large enough to trouble your chickens, but, as some farmers explain, these pests can use the tunnels to access other parts of your property.
Therefore, the pest-proof chicken tunnel is a chicken tunnel that is made using wire mesh which is then wrapped using chicken wire. You can use this approach in sections where entry by pests into the tunnels is more likely.
6. Wire Mesh Chicken Tunnel
Wire mesh is a great material for the construction of a chicken tunnel because it holds its shape easily and is strong enough to keep out many predators.
This chicken tunnel is made by taking a section of wire mesh and simply folding the sides to form a rectangular arch. The bottom part of the mesh can be secured to the ground using landscaping staples, stakes, or whatever else gets the job done.
You can easily make your tunnel bigger just by starting with a wider wire mesh. Bigger tunnels are good if you have more chickens to avoid crowding inside the channels.
The notable downside of this chicken tunnel is that since it’s mainly held up by the strength of the wire mesh, a low-gauge wire mesh won’t be very effective against heavy predators.
7. Wood-Frame Chicken Tunnel
This is undoubtedly one of the more demanding DIY chicken tunnels ideas, but the result is possibly the best-looking of the bunch.
The chicken tunnel is built up against a fence and a wooden frame is built to run along the length of the fence. The top of the tunnel is not left open but is instead covered using a planter.
The front of the tunnel, which is the only side that is left open, is covered using hardware cloth that is stapled to the wooden frame.
The result is a great-looking chicken tunnel that will be effective against most predators. This approach works great for a short chicken tunnel but will be expensive if you want tunnels that cover more space.
It may also be challenging to achieve for individuals with limited woodworking skills.
8. Movable Chicken Tunnel
Unless they lead to some other open space, the ground inside a chicken tunnel will be quickly dug up by chickens. An easy way around this is to make your chicken tunnel movable.
There are two ways of making your chunnel movable. You can make it using a flexible mesh that can be lifted from one part of your garden to another without being disconnected from the coop.
Alternatively, you can build your chicken tunnel in detachable sections that are easy to move from one spot to the next.
9. Flex-Pipe Chicken Tunnel
This is another simple chicken tunnel idea that is also going to cost you very little money. Additionally, you don’t even have to use zip ties or anything else to attach the chicken wire to the supports.
To make this chunnel, you simply need a length of flex pipe and a roll of chicken wire. The ½ inch flex pipe is cut into lengths equal to the width of the chicken wire and threaded through the holes, as seen in the video, at different sections.
The chicken tunnel takes on an arch shape quite easily and all that is left to do is place it at the right spot for your chickens. Stakes are added to secure the bottom of the chicken run and prevent other animals from entering the chicken tunnel.
10. Shaded Chicken Tunnel
Having your chickens outside is great but don’t forget that temperatures can get very hot especially in the summer.
A great chicken tunnel idea is to have sections of the tunnels that are shaded. You can achieve this by simply adding tarps at specific sections.
Alternatively, you can also create a larger shaded area between different tunnel sections.
11. The Nothing-But-Tunnel Chunnel
Many farmers use chicken tunnels like a portable run so they can get their chickens to free-range. However, sometimes you just need a chicken tunnel so your chickens can get from their coop to some other area where they can forage.
In this case, your channel will serve as only a conduit, and a good example of this is shown below.
This type of chicken tunnel can have a much more rigid construction, e.g., using wood. Even the floor is wooden since the chickens are not expected to forage on the ground inside the tunnel.
There is less space inside the tunnel and the top is also completely covered by wood. This makes the tunnel more rigid and less likely to be penetrated by a predator.
12. PVC-Pipe Chicken Tunnel
If you don’t mind doing a lot of measuring, cutting, and joining, you can also go with a portable PVC chicken tunnel.
The PVC pipes are straight and more rigid than the plastic pipes used in previous designs. This makes it a good material choice for a chicken tunnel with a more rectangular shape.
Depending on how long you want your chicken tunnel, you’ll need to add different joints through the design to form the frame. Once you have a frame, you can simply wrap the chicken wire around it.
This type of chicken tunnel will cost you a lot more time and money. However, the result is something that will look better and is likely to serve you for longer.
13. Big Chicken Tunnel
Many of the previous chicken tunnels have been relatively small. These are adequate for a backyard farmer with a small flock.
However, if you have more chickens, you’ll certainly need something bigger, and this is where this big chicken tunnel comes in.
This chicken tunnel uses electric metallic tubing that is bent using a hoop bender into an arch. Several of these hoops are spaced out and joined using two ¾ inch PVC pipes and one straight piece of the electric metallic tubing to form the semi-circular frame.
Instead of chicken wire, black deer netting is used to cover the frame. The netting is tied to the frame using vinyl-coated wire.
Using this netting makes this chicken tunnel cheaper to construct but this netting may not keep out many predators. The main challenge with this design is the amount of work needed to shape and join the frame.
14. Multi-Section Chicken Tunnel
This chicken tunnel is designed to be easily taken apart, but it is also quite rigid once it’s set on the ground. The rectangular frame is made using PVC pipes and joined together using regular PVC pipe fittings.
Once cut and assembled, chicken wire is used to cover the top and sides of the chicken tunnel. The ends are left open since each of these tunnel sections are supposed to connect with other sections.
Each of the sections is very light, making it easy to set up or remove the tunnel.
15. Rigid Chicken Tunnel
This last chicken tunnel is not as accessible as the others on this list. It is made using heavy-duty wire mesh which doesn’t just hold its shape well, it also forms a barrier that’s not likely to be penetrated by any predators.
It will likely take a lot of effort or even special tools to bend this type of wire mesh into shape. However, if you can achieve this, you’ll end up with one of the safest chicken tunnels possible.
Also Read:
Making Your DIY Chicken Tunnel Safer
As you can see from the list above, not every chicken tunnel idea is equal. Some will clearly offer more protection from predators than others while others will cost you a lot less money.
If predators are a significant problem in your location, there are some measures you can take to keep your chickens safe such as:
- Using wire mesh or stronger netting over the chicken tunnel
- Securing the bottom of the chicken tunnel using pegs
- Using chicken wire over wire mesh with large holes for extra security
- Installing a secure door on the coop side of the tunnel that you can lock at tight.
A Chicken Tunnel for Every Backyard
Whether you just want to keep your chickens out of your garden, or you only have a small space available for them to forage, there are many chicken tunnels ideas that you can try.
All of the ideas listed above can be modified to suit a larger or small flock of chickens. Many of these tunnels can also enable your chickens to forage without worrying about most predators.
There are some DIY chicken tunnels that will require you to spend a bit more money while others will require the use of power tools. These can make them harder to achieve for some backyard farmers.
Even so, there are plenty of other accessible ideas that you can try that require nothing more than some chicken wire, something to support it and a little bit of your time.