With a 50% mortality rate, bumblefoot in chickens is a chronic condition that can lead to severe outcomes, including lameness, painful abscesses, and, in extreme cases, amputation. Despite its fatality, bumblefoot is a relatively easy infection to cure, with up to 100% full recovery in the early stages.
The condition is fairly common, and treatment is straightforward through antibiotic therapy and surgical treatments. More common in heavier chicken, bumblefoot is also a preventable condition that is easy to manage and control.
In this article, we will take a look at the standard acceptable treatment for curing bumblefoot in chickens. We will also look into the causes of the disease, the symptoms, stages, prevention methods, and proper aftercare practices.
What Is Bumblefoot
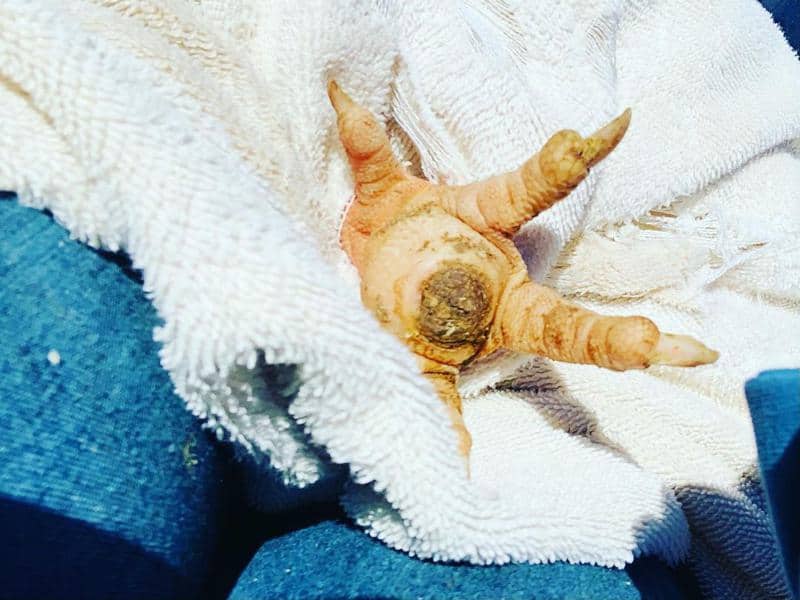
Bumblefoot, also known as plantar pododermatitis (or just pododermatitis), is a staph bacterial infection that primarily affects the footpad of chickens. It is characterized by the formation of a localized black/dark scab or abscess on the bottom of the foot, often leading to lameness.
It is called ‘bumblefoot’ because of the coloration – a black spot on the footpad against the yellow background of the foot.
The black spot, referred to as the bumble or kernel, is a hard scab or abscess that contains localized lesions of dead masses of tissue.
Bumblefoot is caused by the introduction of bacteria into small cuts or abrasions on the footpad, resulting in inflammation and infection. The condition is a prevalent case in heavier birds and males, and can potentially be debilitating, leading to severe cases that may require amputation.
However, before you jump the gun, it is important to note that not all swellings on the footpad mean your chickens have bumblefoot.
Some cases of chicken swollen foot are not bumblefoot (planter pododermatitis).
‘Plantar’ means ‘bottom’, referring to the bottom surface of the chicken’s foot. ‘Pododermatitis’ is a general word used to describe inflammatory conditions that affect birds’ feet.
Planter pododermatitis can refer to a wide range of conditions like redness on the feet, swelling, abscesses, and bone deformations. However, the condition is only referred to as bumblefoot when the swelling involves a black/dark scab with a pus-filled cavity.
Potential causes of non-bumblefoot infections include trauma, pressure ulcers, abscesses unrelated to bumblefoot, or joint issues.
Proper diagnosis by a veterinarian is crucial to ensure accurate diagnosis and treatment.
What Causes Bumblefoot in A Chicken?
Bumblefoot is primarily caused by the introduction of Staphylococcus bacteria (mainly S. aureus strain) into the footpad.
S. aureus is the cause but not the only bacteria found in bumblefoot infections, other bacteria include the Corynebacterium species, Pseudomonas species, and E. Coli.
These bacteria can infiltrate the footpad through minor cuts, scrapes, or abrasions, often resulting from rough, sharp, or uneven surfaces in the chicken’s environment.
Once the bacteria enter the skin, they cause acute necrotic inflammation which results in the formation of dead tissue masses. These masses are the localized lesions containing bacterial colonies that will spread and cause further infections.
Factors that contribute to the development of bumblefoot include poor litter management and quality, improper roost design, and inadequate sanitation practices.
Other risk factors that lead to the development of bumblefoot include:
- Prior foot injury
- Overweight
- Illnesses affecting posture, like arthritis
- Overgrown toenails
- Low activity or excessive activity
- Obesity
- Poor diet, with Vitamin A deficiency and other imbalances.
- Overly dry skin
- Leg or foot abnormality
- Dirty, wet, unsanitary bedding
- Rough and sharp surfaces
- Hard and coarse floor surfaces like cement floors
Stages of Bumblefoot
The infection goes through various stages/phases, all with varying symptoms and signs that can be used to identify how far the infection has spread.
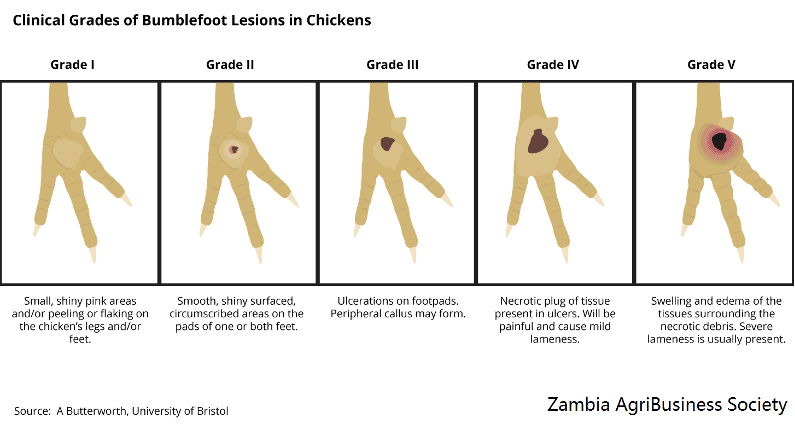
Phase 1: Initial Inflammation and Swelling
In the early Stage of bumblefoot, the footpad of the chicken becomes inflamed after infections and slightly swollen. The affected area may appear reddish/pinkish, raised/rough, and feel warm to the touch.
During this Stage, the infection is localized, and the bird’s overall behavior might only show subtle changes.
Phase 2: Nodule Formation
As the infection progresses, a small raised nodule or lump forms within the inflamed area on the footpad. This nodule is often the result of accumulated immune cells and inflammatory material.
The nodule may be firm to touch and may cause the chicken to experience a bit of discomfort. It’s important to note that early intervention at this Stage can prevent the condition from advancing to more severe levels.
Phase 3: Abscess Development
This is the Stage where most chicken keepers start noticing the signs and symptoms.
In the third Stage, the inflammatory response intensifies, leading to the formation of an abscess. The abscess is a localized pocket of pus that develops beneath the skin and within the footpad.
There is further swelling, increased pain, and worsening discomfort. The abscess can cause the chicken distress, leading to slight reluctance to bear weight on the affected foot.
Phase 4: Rupture or Ulceration
As the abscess continues to grow, it may eventually rupture or ulcerate, resulting in the release of pus and infected material. The rupture can create an open wound on the footpad, exposing underlying tissues. At this Stage, the chicken’s distress and discomfort can become severe due to the exposed wound and increased pain. The risk of secondary bacterial infections also rises as the skin barrier is compromised.
Phase 5: Chronic Infection and Complications
If left untreated, bumblefoot can progress to this chronic Stage. Chronic bumblefoot can result in permanent deformities, lameness, reduced mobility, and overall compromised health for the chicken.
Secondary complications like septicemia, or blood infection, may arise if the infection spreads systemically.
Symptoms of Bumblefoot in Chickens
The first visible sign is a reddish to pinkish rough area at the bottom of the chicken’s foot. As the disease progresses, more signs arise showing the progression from one Stage to another.
Common symptoms of bumblefoot include:
- Development of a dark/black scab on the affected area – seen as a dark spot on the sole.
- Swelling or inflammation on the footpad and around the toes
- Pus-filled abscess on the pad of chicken’s foot
- Reluctance to engage in normal activities such as walking, perching, or scratching
- Elevated body temperature and signs of discomfort
- Limping or favoring one foot
- Lameness and swollen feet joints
Treatment for Bumblefoot in Chickens
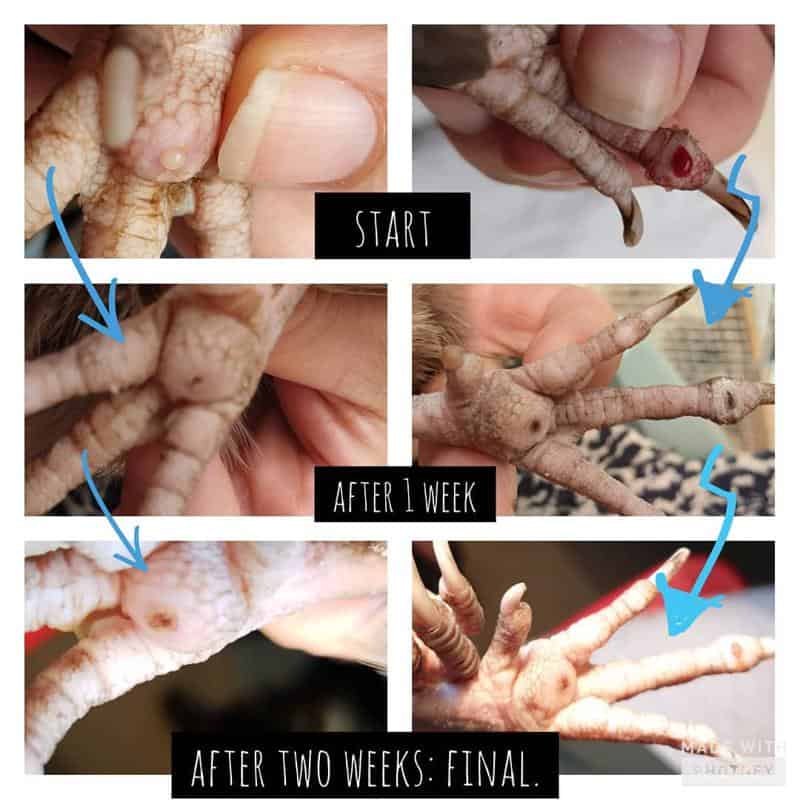
Bumblefoot in chicken is often treated by the use of antibiotic treatments to get rid of the infections. Whether in the early stages or later, surgical/manual removal is required to get rid of the localized scabs and abscesses.
1. Natural Treatment
How to treat bumblefoot in chickens naturally involves the ‘wait and see’ approach since the chicken’s immune system often fights off staph infections in the early stages.
Some poultry keepers opt for natural remedies, such as Epsom salt baths and the application of herbal poultices. These methods can help reduce inflammation and promote healing.
You can also use all-natural wound care products for cleaning animal wounds, like Vetericyn Plus Wound & Skin Care Spray, to avoid infections and promote healing.
It is important to note that these treatments are only effective for milder cases of bumblefoot (below Phase 2). After Phase 3, bumblefoot can only be treated with a combination of antibiotic therapy and surgical treatments using the conventional procedures laid out below.
2. Conventional Treatment
The standard acceptable treatment for bumblefoot involves two stages:
- Drawing Stage- helps soften the lesion and scab so as to draw dead flesh onto the surface.
- Removal Stage – involves manually or surgically removing the lesions.
Needed Supplies:
- Epsom salt bath
- Bath towels and Paper towels
- Basin
- Gloves
- PRID Drawing Salve
- Antibacterial Spray like Vetericyn Plus
- Antibiotic ointments like Neosporin Triple Antibiotic Ointment
- Antiseptic liquids like Betadine or Hydrogen Peroxide
- Tweezers
- Scalpel (for surgical removal – severe cases of bumblefoot)
- Vet wraps and animal bandages
Steps
- Step 1:
For severe cases, you should start with a pre-treatment plan where you use products like the PRID drawing salve. The salve helps soften the skin over the infections, thereby allowing the head to mature faster and easily expel itself from the foot.
Doing the pre-treatment for about a week helps draw the infection to the surface and makes it easier to peel off the scab without the need of cutting using a scalpel or knife.
- Step 2:
This is where we use the Epsom bath. Also, this is Step 2 for most severe cases or is the Step 1 for less severe cases (Phase 3 or lower).
Use about 1-2 cups of Epsom salt in warm water in a basin. Soak the foot in the Epsom salt bath to help the chicken relax and further soften the scab.
Let the feet soak for about 20 minutes – 45 minutes.
- Step 3:
Remove the foot from the bath and use the bath towels to wrap around the chicken. This helps calm the bird and also give you room to properly remove the infection.
Use the antibacterial spray and paper towels to disinfect and clean the foot.
- Step 4:
Once the scab has softened and you have disinfected the area, use your fingers to gently remove the blackhead (it should pop off easily with a bit of force; otherwise, proceed to soak the leg for longer).
Note: Please ensure you use gloves during the removal of the scab since the staph bacteria can be transmitted to humans.
Use tweezers to help lift off the lesions from the foot.
Take a look at this YouTube Video that shows a practical tutorial on the process:
- Step 5:
Drawing using drawing salve, Epsom bath, and tweezers won’t be enough for severe cases. You may need to use a blade or scalpel to cut off extra chunks of lesions around the bumblefoot.
Proceed to take the scalpel and cut it down into the footpad. Ensure you only cut the dead flesh regions and use the antibacterial spray to avoid any infections.
Carefully remove the abscess with the scalpel until there are no more lesions left on the foot. If you are unsure if lesions are still present, you can proceed to redo this process in less than a week.
- Step 6:
The pus-filled cavity will be exposed once the entire scab, abscess, and lesions have been removed. Apply pressure around the footpad while pushing the entire cavity out, ensuring none of the abscess is left.
- Step 7:
Finish up by using an antiseptic liquid, like hydrogen peroxide or Betadine, to flush the open cavity by removing all the pus and debris.
- Step 8:
Once flushed and clean, proceed to use triple antibiotic ointments, like the Neosporin Triple Antibiotic Ointment, to pack the cavity. Administer as per label directions for the specified period.
- Step 9:
Finish the treatment by wrapping the footpad with animal bandages and vet wraps to keep the cavity clean and dry.
Do not forget to wash hands, gloves, and related equipment afterward. Also, get rid of the pus and scab flesh properly since they can be contagious to humans and other animals. Do this by deep burial or incineration.
Preventing Chicken Bumblefoot
The best prevention method for the condition is to ensure any wound or injury does not get infected. Do this by:
1. Inspecting chicken regularly for wounds, cuts, and infections
Check for redness, pinkish swellings, sores, pressure ulcers, and rough areas that have developed due to some trauma. Have a routine schedule for the inspection for early detection.
2. Treat Wounds and Cuts
Wash the affected areas with warm water and use antiseptic agents to clean them. Use antibacterial solutions and treats to dry off the wounds to prevent infections.
Use vet wraps and animal bandages to wrap the wounds and cuts to ensure they are extremely dry without any access to wet and damp surfaces.
Ensure the chicken does not come near any surfaces that can lead to an infection. This can be done by restraining the wounded chicken to a closely monitored housing.
3. Proper Housing and Environment Maintenance
Ensuring the environment the chickens run in is free of rough surfaces, objects, sharp edges, et cetera, will reduce the risks of injuries and wounds that lead to bumblefoot. Also, keep the coop clean and dry.
Moreover, the housing and roosting poles should be low enough to the ground to prevent chickens from jumping from potentially dangerous higher grounds.
About 18 inches (45 cm) is the maximum recommended height for avoiding injuries while jumping. Please keep in mind heavier birds need to jump from lower heights. You may also use ramps and ladders to prevent heavier chickens from jumping.
4. Diet
As stated earlier, obesity and vitamin deficiency are contributing factors to bumblefoot. By ensuring your chickens are fed appropriately, you can reduce the risk of contracting bumblefoot since they will be less prone to injuries and can easily fight off infections.
Take more time to monitor and inspect obese chickens and other malnourished or sick birds.
Read More:
FAQs
What Antibiotic Treats Bumblefoot?
Chickens are extremely sensitive to pain relief medications; therefore, you have to use antibiotics without pain relievers like the Neosporin Triple Antibiotic Ointment.
You can also use an Iodine solution as an antiseptic and disinfectant that will prevent infections in the wound by killing and controlling harmful microbe growth.
Another post-treatment solution is Vetericyn Plus, which is used to manage wounds by providing proper moisture balance on the affected area and relieving pain from skin irritations. It is most recommended since it is safe for all animals in various life stages.
How Long Does It Take For Bumblefoot To Heal?
Treatment takes weeks to months to fully recover your chicken.
The healing duration of bumblefoot can vary based on the severity of the infection, the treatment method used, and the overall health of the chicken.
Generally, with proper care and treatment, mild cases of bumblefoot may completely heal within a few weeks, while more severe cases may require a longer healing period of up to several months.
Will Bumblefoot Go Away on Its Own?
The bumblefoot infection can worsen without intervention, leading to increased swelling, abscess formation, and severe lameness. If left untreated, bumblefoot can negatively impact the chicken’s overall well-being and ability to move comfortably.
How Long Can A Chicken Live With Bumblefoot?
Bumblefoot has a high 50 percent mortality rate. Furthermore, the condition worsens the longer it goes untreated. If another infection exists, then fatal conditions may arise since the chicken cannot fight the staph infection properly.
With that in mind, the chicken can survive for months without treatment if the infections are well managed, but some hens can develop mobility issues in a matter of weeks if the infections are rampant.
Early treatment is advised.
Conclusion
As you can tell, treating bumblefoot is straightforward, and any chicken keeper can easily perform the procedures. The key factor is to ensure early detection, prompt treatment, and appropriate aftercare practices that prevent the progression of the infection.
By maintaining a clean & dry environment, proper litter management, and keeping the beddings clean, poultry keepers can effectively minimize the risk of bumblefoot and ensure the optimal health of their flocks.